English
 русский
 日本語
日本語 عربى
عربى Español
Content
- 1 Yes, You Can Use Vinegar to Clean Your Water Dispenser — Here's What You Need to Know
- 2 Why Cleaning Your Water Dispenser Regularly Is Non-Negotiable
- 3 How Vinegar Works Against Scale, Bacteria, and Odors
- 4 What You'll Need Before You Start
- 5 Step-by-Step: How to Clean a Water Dispenser with Vinegar
- 6 Cleaning Frequency and Maintenance Schedule
- 7 Cleaning Different Types of Water Dispensers with Vinegar
- 8 Common Mistakes That Reduce Cleaning Effectiveness
- 9 Signs Your Water Dispenser Faucet or Reservoir Needs Immediate Cleaning
- 10 Vinegar vs. Other Water Dispenser Cleaning Methods
- 11 Frequently Asked Questions
- 11.1 How much vinegar do I need to clean a 5-gallon water dispenser?
- 11.2 Will my water taste like vinegar after cleaning?
- 11.3 Can I use cleaning vinegar instead of regular white vinegar?
- 11.4 How do I clean the water dispenser faucet if it doesn't come off?
- 11.5 Is it safe to leave vinegar in the dispenser overnight?
- 11.6 Can vinegar damage my water dispenser?
- 11.7 Does vinegar kill Legionella bacteria in water dispensers?
Yes, You Can Use Vinegar to Clean Your Water Dispenser — Here's What You Need to Know
The short answer is yes — white vinegar is one of the most effective, food-safe, and affordable solutions for cleaning a water dispenser. Its natural acidity dissolves mineral deposits, kills a broad spectrum of bacteria, and removes the musty odors that build up inside reservoirs, internal tubing, and the water dispenser faucet over time. Unlike harsh chemical cleaners, diluted white vinegar leaves no toxic residue and requires no special equipment. However, using it correctly matters. Done wrong, you may leave behind a vinegar taste, miss key internal surfaces, or damage rubber seals in older units.
This guide walks through every step of the process in detail — from what concentration to use, to how long to let it soak, to the parts most people forget to clean. Whether you have a countertop bottle-fed cooler, a bottom-loading unit, or a point-of-use dispenser connected to your plumbing, the core method applies.
Why Cleaning Your Water Dispenser Regularly Is Non-Negotiable
Many people assume that because the dispenser only handles drinking water, it stays clean on its own. That assumption is wrong. Water — especially when it sits in a reservoir at room temperature — creates an ideal environment for microbial growth. Studies on water cooler contamination have found coliform bacteria and even Legionella in improperly maintained units.
The water dispenser faucet is one of the most contaminated spots on any cooler. Hands touch it dozens of times a day. Cups and bottles make contact with the nozzle. Moisture collects around the spigot and encourages mold and biofilm formation. A faucet that looks clean from the outside can harbor significant microbial buildup inside the spout channel.
Beyond bacteria, hard water leaves calcium and magnesium deposits — commonly called limescale — on all internal surfaces. Over time, limescale:
- Clogs the flow path inside the faucet, reducing water pressure
- Builds up in the reservoir and supply lines, becoming a substrate for biofilm
- Affects water taste, making it flat or slightly metallic
- Strains the dispenser's heating and cooling elements, shortening the unit's lifespan
The NSF International recommends cleaning water coolers and dispensers every 6 to 12 weeks. If your water supply is particularly hard, or if the unit is used frequently in an office or commercial setting, every 4 to 6 weeks is more appropriate.
How Vinegar Works Against Scale, Bacteria, and Odors
White distilled vinegar contains approximately 5% acetic acid. That concentration is acidic enough to dissolve calcium carbonate (the primary compound in limescale) through a straightforward chemical reaction, yet dilute enough to be completely safe in food-contact applications when rinsed thoroughly.
On the microbial side, acetic acid disrupts bacterial cell membranes. Research published in food science journals has confirmed that a 5–10% acetic acid solution kills E. coli, Salmonella, and Listeria within minutes of contact. It also inhibits mold growth, which is relevant for any moisture-retaining part of your dispenser, including rubber gaskets around the faucet and seals inside the reservoir lid.
For odor elimination, acetic acid neutralizes alkaline compounds — which are responsible for most musty and stale water smells — rather than just masking them. This makes vinegar more effective at odor control than many commercial cleaners that rely on fragrance.
One important limitation: vinegar is less effective against heavy biofilm that has been allowed to build up for months. In those cases, a first pass with a diluted bleach solution (1 tablespoon per gallon of water) followed by a vinegar rinse cycle gives more thorough results. For routine maintenance on a regularly cleaned unit, however, vinegar alone is sufficient.
What You'll Need Before You Start
Gather everything before beginning. Having to stop mid-process leaves water or cleaning solution sitting in the unit longer than intended, which can create problems of its own.
- White distilled vinegar — at least 1 liter for a standard 5-gallon bottle cooler; cleaning vinegar (6–10% acidity) works faster but requires more rinsing
- Clean water — for dilution and rinsing cycles
- A large bucket or container to catch drainage
- Soft cloths or microfiber towels — avoid abrasive sponges that scratch reservoir surfaces
- A small bottle brush or pipe cleaner for the faucet spout
- Food-safe gloves
- Your dispenser's user manual (faucet removal steps vary by model)
Always unplug the dispenser and allow it to reach room temperature before cleaning. Cleaning a unit while the heating element is still hot risks thermal shock damage to internal components and creates a burn hazard.
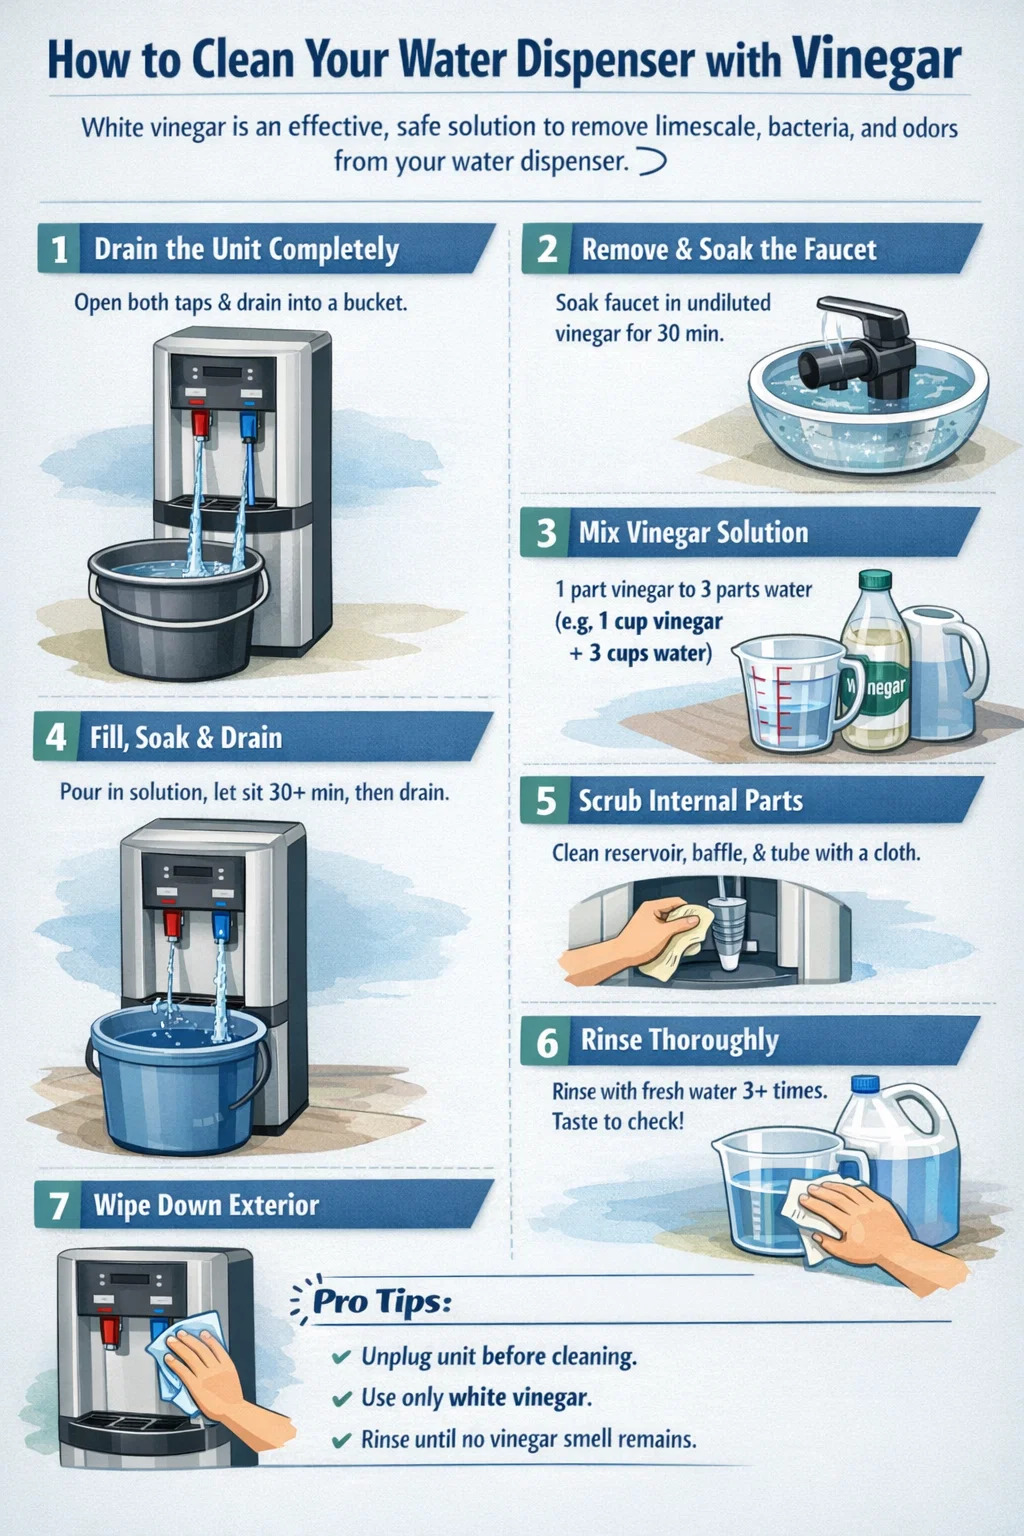
Step-by-Step: How to Clean a Water Dispenser with Vinegar
Step 1 — Drain the Unit Completely
Remove the water bottle or disconnect the supply line. Open both the hot and cold water dispenser faucet valves simultaneously and let the unit drain fully into your bucket. Do not skip the hot water side — it has its own reservoir that needs to be emptied and sanitized separately.
Step 2 — Remove and Soak the Faucet
Most water dispenser faucets detach with a quarter-turn or a simple pull. Check your manual for specifics. Once removed:
- Submerge the faucet body and any removable nozzle or spout pieces in a bowl of undiluted white vinegar.
- Let them soak for at least 30 minutes — longer if there is visible scale buildup inside the spout channel.
- Use a small bottle brush to scrub the inside of the spout while still submerged.
- Rinse thoroughly under running water and set aside.
The faucet is the most touched and most contaminated component on any water cooler. Giving it a dedicated soak rather than a quick wipe is essential.
Step 3 — Prepare the Vinegar Cleaning Solution
Mix a solution of 1 part white vinegar to 3 parts water. For a standard top-load cooler with a 5-gallon capacity reservoir, this means approximately 250 ml of vinegar in 750 ml of water — enough to fill the reservoir to roughly 1 liter. You do not need to fill it completely; the solution just needs to be able to flow through all internal passages.
If your unit has heavy limescale or has not been cleaned in more than 6 months, increase the concentration to 1 part vinegar to 1 part water for the first cleaning cycle.
Step 4 — Fill, Soak, and Drain
Pour the vinegar solution into the reservoir. Replace the faucet temporarily (or hold a cloth over the opening). Let the solution sit in the reservoir for at least 30 minutes. For stubborn scale or long-neglected units, leave it for up to 2 hours.
After soaking, open the faucet and drain the vinegar solution completely into your bucket. Tilt the unit slightly forward (with care) to ensure full drainage from the back of the reservoir if your model tends to retain water in corners.
Step 5 — Scrub Internal Surfaces
While the reservoir is empty and still damp from the vinegar solution, use a soft cloth or sponge to wipe down all accessible interior surfaces. Pay particular attention to:
- The baffle (the plastic disc at the bottom of the reservoir that regulates water flow)
- The probe tube (the hollow tube that extends down into the reservoir)
- The reservoir walls near the waterline, where pink or orange biofilm often develops
- The rim and underside of the reservoir opening
Step 6 — Rinse, Then Rinse Again
This is the step most people rush — and it's where residual vinegar taste comes from. Fill the reservoir with clean, fresh water and drain it completely through the faucet. Repeat this process a minimum of 3 times. After the third rinse, collect a small amount of the drained water in a clean cup and taste or smell it. If you detect any vinegar odor, run at least one additional rinse cycle.
For hot-water dispensers, after the final rinse cycle, plug the unit back in, allow the heating element to warm up fully (typically 10–15 minutes), then dispense and discard one full cup of hot water before normal use resumes.
Step 7 — Wipe Down External Surfaces
Dampen a cloth with a small amount of undiluted vinegar and wipe down the exterior of the unit, including the drip tray, the area around the faucet opening, the side panels, and the back vents. The drip tray in particular accumulates stagnant water, mold, and residue from overflow. Remove it entirely if possible, wash with dish soap, rinse, and dry before replacing.
Cleaning Frequency and Maintenance Schedule
How often you clean your dispenser depends on several variables. The table below provides a practical reference:
| Usage Context | Recommended Cleaning Interval | Notes |
|---|---|---|
| Household use, 1–3 people | Every 6–8 weeks | Standard white vinegar dilution sufficient |
| Family household, 4–6 people | Every 4–6 weeks | Clean faucet weekly with damp cloth |
| Office environment, up to 20 users | Every 3–4 weeks | Wipe faucet daily; consider food-safe sanitizer for high-traffic settings |
| Hard water area (≥200 ppm TDS) | Every 3–4 weeks | Use undiluted vinegar on faucet scale; extend soak time to 2 hours |
| Units not used for 1+ weeks | Before resuming use | Stagnant water increases bacterial risk significantly |
Between full vinegar cleanings, a quick weekly wipe of the water dispenser faucet with a cloth dampened in diluted vinegar takes under a minute and significantly reduces bacterial buildup between full cleaning cycles. Make it part of your kitchen cleaning routine rather than a separate task.
Cleaning Different Types of Water Dispensers with Vinegar
The core vinegar cleaning method applies to all dispenser types, but the specifics vary. Understanding your unit's design ensures you don't miss any surface.
Top-Load Bottle Dispensers
These are the most common type and the most straightforward to clean with vinegar. The reservoir is directly accessible once the bottle is removed. The primary concern is the probe tube and baffle, which make direct contact with the water bottle neck and can harbor bacteria if the area around the bottle seat is not cleaned thoroughly. After draining, wipe the bottle seat area with a vinegar-soaked cloth and let it air dry before placing a new bottle.
Bottom-Load Dispensers
Bottom-loading units have the water pump and supply tube in the cabinet below. After draining through the faucet, pour the vinegar solution into the reservoir from the top (accessible once you remove the cover) rather than through the pump system. Some models have a dedicated cleaning port — check the manual. The water pump itself is generally not user-serviceable, but the tubing from the bottle to the reservoir should be flushed with the cleaning solution as part of each cycle.
Point-of-Use (POU) Dispensers
Point-of-use dispensers connect directly to your home's water supply. Because they are always connected, you need to shut off the water supply line before cleaning. Pour vinegar solution directly into the reservoir, allow to soak, and flush through the faucet. Run at least 4–5 full rinse cycles given the longer internal tubing these systems typically have. POU units often have sediment pre-filters — replace the filter cartridge at the same time as your cleaning session for best results.
Countertop Mini Dispensers
Compact countertop units typically have a smaller reservoir volume (1–2 gallons). Use proportionally less vinegar solution — around 200–250 ml of vinegar diluted to 800 ml total. Because of the smaller volume, soaking times can be slightly shorter (20 minutes), but rinse cycles are just as important. The faucet on countertop models is often a simple lever nozzle — remove it and soak separately for the most thorough clean.
Common Mistakes That Reduce Cleaning Effectiveness
Even with the right cleaning agent, poor technique produces poor results. These are the most frequent errors:
- Not removing the faucet. Wiping around the faucet exterior while leaving the internal spout channel uncleaned means the most contaminated part of the unit is never addressed. Always detach and soak the faucet.
- Insufficient soak time. A 5-minute soak does not give acetic acid enough contact time to fully dissolve scale or sanitize surfaces. Thirty minutes is the minimum; 2 hours for heavy buildup.
- Skipping the hot water reservoir. The hot tank retains water for extended periods at warm temperatures — a prime environment for bacterial growth. It must be drained and flushed with vinegar solution every cleaning cycle.
- Not rinsing enough. One or two rinse cycles are rarely enough to fully remove vinegar flavor, especially in units with longer internal tubing. Three rinses minimum; taste-test before use.
- Ignoring the drip tray. The drip tray collects water, dust, and overflow constantly. Mold in the drip tray gets aerosolized each time someone operates the faucet, contaminating the water stream indirectly.
- Using apple cider vinegar or other varieties. Only use plain white distilled vinegar. Apple cider vinegar and other flavored varieties leave sugars and residues that encourage bacterial growth rather than eliminating it.
Signs Your Water Dispenser Faucet or Reservoir Needs Immediate Cleaning
Do not wait for the calendar to prompt a cleaning if you notice any of the following warning signs. These indicate contamination or damage that requires immediate attention:
- Pink or orange slime on the reservoir walls or around the faucet — this is Serratia marcescens, a bacteria common in water environments that produces a characteristic pink-red pigment
- Black or green spots around the faucet base or inside the drip tray — indicates mold growth
- Musty or earthy taste in water that was previously neutral — biofilm in the reservoir or supply lines
- Reduced water flow from the water dispenser faucet despite a full bottle — limescale blockage inside the spout
- White crust or flaking visible on any internal surface — heavy mineral deposit accumulation
- Leaking around the faucet — scale buildup inside the faucet body can prevent the valve from sealing completely, causing drips; cleaning often resolves this before replacement becomes necessary
If you encounter pink slime or significant mold, use a diluted bleach solution (1 tablespoon per gallon) for the cleaning cycle rather than vinegar, then follow with a vinegar rinse to neutralize any bleach residue, and finish with plain water rinse cycles.
Vinegar vs. Other Water Dispenser Cleaning Methods
Vinegar is not the only option. Understanding how it compares to other approaches helps you choose the right tool for your specific situation.
| Cleaning Method | Descaling | Sanitizing | Safety | Cost | Best For |
|---|---|---|---|---|---|
| White vinegar | Excellent | Good | Very safe | Very low | Routine maintenance, scale removal |
| Diluted bleach | Poor | Excellent | Requires careful rinsing | Very low | Heavy bacterial contamination, mold |
| Commercial descalers | Excellent | Variable | Check food-safe certification | Medium–High | Severe scale; commercial settings |
| Baking soda + water | Poor | Minimal | Very safe | Very low | Odor neutralization only |
| Citric acid solution | Excellent | Good | Very safe | Low | Hard water scale; no vinegar odor concern |
Citric acid is worth mentioning as a strong alternative to vinegar for users who are particularly concerned about residual taste. A solution of 1 tablespoon of food-grade citric acid powder per liter of water provides comparable descaling power with a more neutral flavor profile than acetic acid and typically requires fewer rinse cycles.
Frequently Asked Questions
How much vinegar do I need to clean a 5-gallon water dispenser?
You do not need to fill the entire reservoir with vinegar solution. For a standard 5-gallon unit, prepare approximately 1 liter of cleaning solution using a 1:3 ratio of vinegar to water — that's roughly 250 ml of vinegar and 750 ml of water. This volume is sufficient to contact all internal reservoir surfaces and flow through the internal passages when you open the faucet.
Will my water taste like vinegar after cleaning?
Only if you did not rinse thoroughly enough. After the vinegar soak and drain, complete at least 3 full rinse cycles with clean water, flushing completely through the water dispenser faucet each time. Before refilling with a new bottle, taste the water from the final rinse. If there is any vinegar smell or taste, run another rinse cycle. Any residual taste should fully disappear within the first bottle of use if rinsing was adequate.
Can I use cleaning vinegar instead of regular white vinegar?
Yes, but with caution. Cleaning vinegar contains 6–10% acetic acid compared to the 5% in standard white vinegar, making it more effective at dissolving heavy scale. However, the stronger concentration also means it requires more thorough rinsing — plan for at least 4–5 rinse cycles rather than 3. Never use cleaning vinegar at full strength; dilute it at minimum 1:3 with water for reservoir use.
How do I clean the water dispenser faucet if it doesn't come off?
Some faucets are fixed and cannot be removed without tools. In that case, soak a folded paper towel or small cloth in undiluted vinegar and wrap it tightly around the entire faucet, including the spout opening. Secure it with a rubber band and leave it in place for 30–60 minutes. The vinegar will wick into the spout channel through capillary action. Follow with a small bottle brush or cotton swab soaked in vinegar to scrub the inside of the nozzle, then flush with water.
Is it safe to leave vinegar in the dispenser overnight?
In most cases, yes — for the reservoir itself, an overnight soak in diluted vinegar is safe and effective for severe scale. However, avoid leaving concentrated vinegar (undiluted or at high concentration) in contact with rubber gaskets or seals for extended periods, as it can degrade natural rubber compounds over time. For overnight soaks, use the standard 1:3 dilution and inspect rubber components for softening or cracking after cleaning.
Can vinegar damage my water dispenser?
When used at the correct dilution (1:3 with water) and rinsed properly, white vinegar will not damage standard water dispenser materials including food-grade polycarbonate, stainless steel reservoirs, or PVC tubing. The risk comes from using undiluted vinegar repeatedly over long periods, particularly on older rubber gaskets and natural rubber seals. If your unit is more than 5 years old, inspect seals and gaskets before and after cleaning and replace any that show cracking or softening.
Does vinegar kill Legionella bacteria in water dispensers?
Standard white vinegar (5% acetic acid) has demonstrated activity against Legionella in laboratory settings, particularly with extended contact times. However, if you suspect Legionella contamination — indicated by recent illness in multiple users or a unit that has been stagnant for a month or more — use a diluted bleach solution (1 tablespoon per gallon) as the primary sanitizer rather than vinegar, and consult the unit manufacturer's guidelines for remediation. For routine prevention, regular vinegar cleaning is an appropriate and effective measure.