English
 русский
 日本語
日本語 عربى
عربى Español
Content
- 1 The Short Answer: How to Clean a Spigot
- 2 What Is a Spigot and Why Does It Get Dirty?
- 3 Tools and Materials You'll Need
- 4 Step-by-Step: How to Clean a Spigot Aerator
- 5 How to Clean an Outdoor Spigot or Garden Faucet
- 6 How to Remove Heavy Limescale from a Spigot
- 7 Sanitizing a Spigot for Drinking Water Use
- 8 Cleaning Different Types of Spigot Finishes
- 9 Signs Your Spigot Needs Immediate Cleaning or Repair
- 10 How Often Should You Clean a Spigot?
- 11 Preventing Buildup: Tips for Long-Term Spigot Maintenance
- 12 Common Mistakes When Cleaning a Spigot
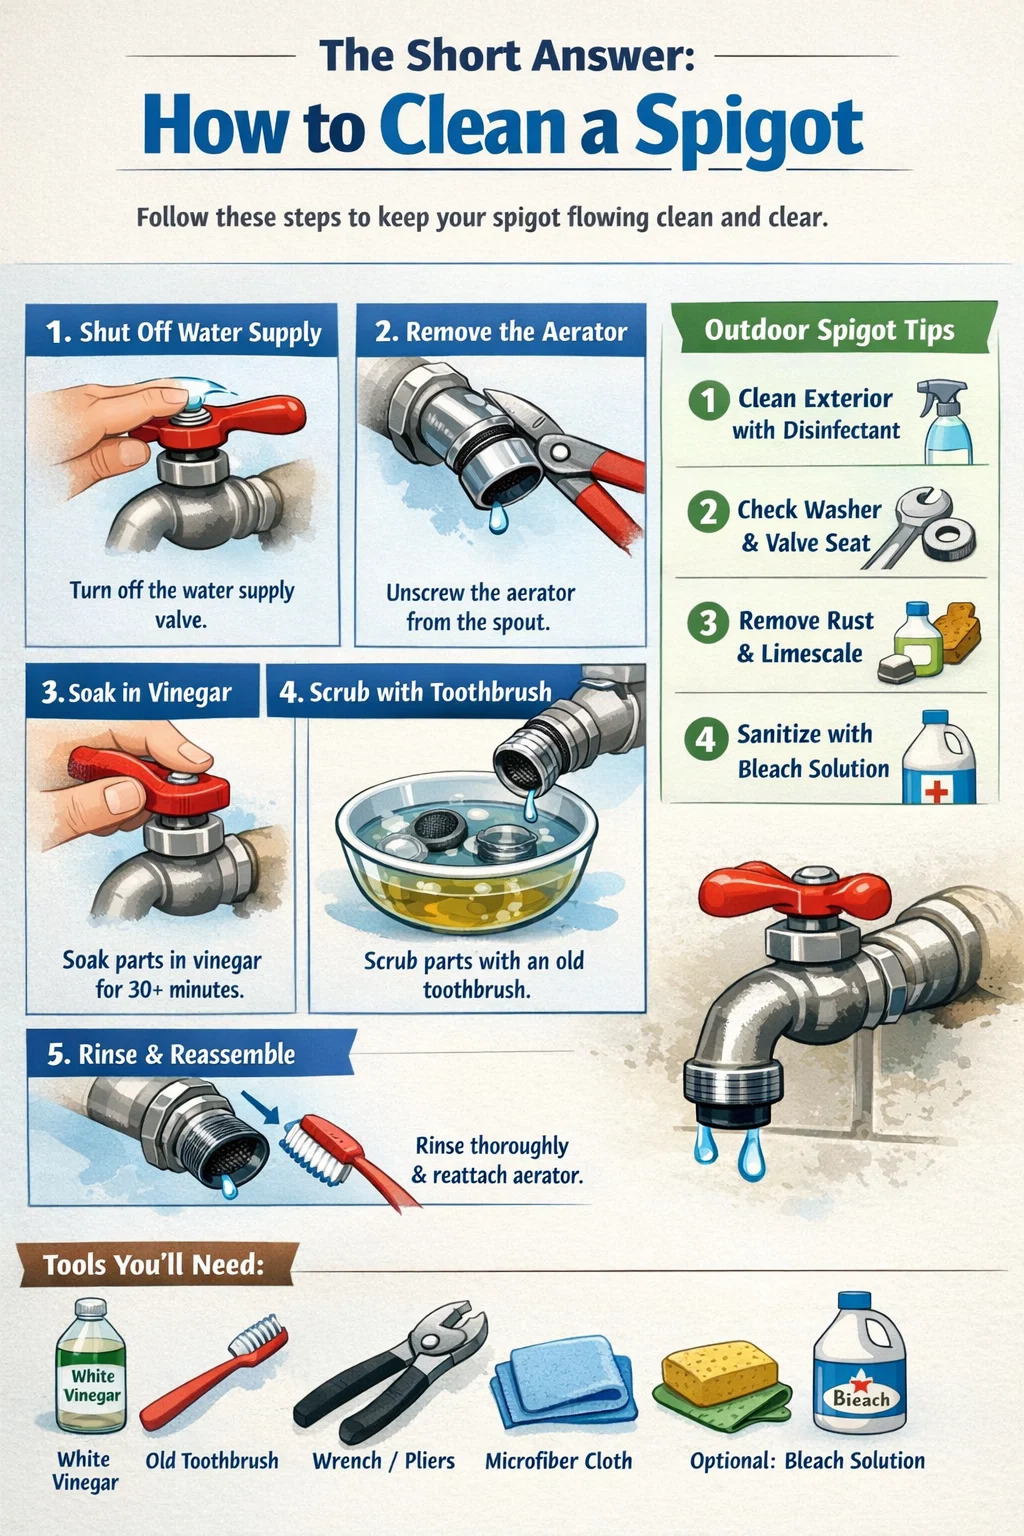
The Short Answer: How to Clean a Spigot
To clean a spigot, shut off the water supply, disassemble the aerator or nozzle tip, soak the parts in a white vinegar solution for at least 30 minutes to dissolve mineral deposits, scrub with an old toothbrush, rinse thoroughly, and reassemble. For outdoor spigots or garden faucets exposed to soil, grime, and weather, you'll also need to wipe down the exterior with a disinfecting solution and inspect the washer and valve seat for buildup.
Most people think a spigot only needs attention when it starts dripping or showing visible rust. In reality, even a faucet that looks fine on the outside can accumulate limescale, biofilm, sediment, and bacteria inside the aerator and around the valve. Regular cleaning — roughly every 3 to 6 months — keeps water flow strong, prevents premature wear on internal parts, and ensures the water coming out is actually clean.
This guide covers everything: the tools you need, how to clean different types of spigots, how to deal with stubborn mineral deposits, how to sanitize outdoor faucets, and how to maintain your spigot so it lasts longer.
What Is a Spigot and Why Does It Get Dirty?
A spigot is a valve-controlled faucet used to regulate the flow of liquid — most commonly water — from a pipe or container. The term is used interchangeably with outdoor faucet, hose bib, bibcock, or garden tap depending on the region, but all refer to the same basic fixture. Indoor faucets in kitchens and bathrooms share many of the same internal components and face similar cleaning challenges.
Spigots get dirty for several reasons:
- Hard water mineral deposits: In areas where water hardness exceeds 120 mg/L (classified as "hard"), calcium and magnesium carbonate build up inside the aerator screen and around the valve seat. This limescale restricts water flow and can reduce pressure by 30 to 50 percent over time.
- Biofilm and bacteria: Spigots — especially outdoor ones — can harbor Pseudomonas, Legionella (in warm climates), and coliform bacteria if not cleaned regularly. A 2017 study found detectable biofilm in more than 60 percent of untreated household tap aerators tested.
- Rust and corrosion: Older brass or iron spigots corrode when protective coatings wear away, leaving reddish-brown deposits that can discolor water.
- Dirt and organic matter: Outdoor spigots collect soil, mold, algae, and debris from garden hoses and the surrounding environment.
- Rubber washer degradation: As washers break down, small particles of rubber and sediment collect around the valve seat and spout opening.
Understanding what you're cleaning — and why — makes it easier to choose the right method and products.
Tools and Materials You'll Need
Before you start, gather everything you need so you're not hunting for supplies mid-job. Most of these are items you already have at home.
| Item | Purpose | Notes |
|---|---|---|
| White distilled vinegar | Dissolving mineral deposits and limescale | 5% acidity is standard; works on calcium and magnesium |
| Old toothbrush | Scrubbing aerator mesh and crevices | Soft bristles preferred to avoid scratching chrome |
| Adjustable wrench or pliers | Removing aerator and packing nut | Wrap jaws with tape to protect finish |
| Small bowl or zip-lock bag | Soaking parts in vinegar solution | Bag method works directly on faucet head without removal |
| Rubber gloves | Hand protection during cleaning | Especially important when using bleach-based sanitizers |
| Microfiber cloth or sponge | Wiping down exterior surfaces | Non-abrasive; won't scratch metal finishes |
| Baking soda (optional) | Mild abrasive for stubborn grime | Paste with vinegar creates scrubbing action |
| Diluted bleach solution (optional) | Sanitizing outdoor spigots | 1 tablespoon bleach per gallon of water is sufficient |
| Replacement washer or O-ring (optional) | Replacing worn seals while the valve is open | Match the size to your existing hardware |
Commercial descalers like CLR (Calcium, Lime, and Rust Remover) are an alternative to vinegar for severe buildup. They work faster — typically 2 minutes versus 30 minutes for vinegar — but require thorough rinsing and are not safe for all metal finishes.
Step-by-Step: How to Clean a Spigot Aerator
The aerator is the small mesh screen screwed onto the end of the faucet spout. It mixes air into the water stream to reduce splashing and conserve water — but its fine mesh traps mineral particles, debris, and sediment faster than any other part of the spigot. Cleaning the aerator is the single most impactful maintenance task you can do.
Step 1: Shut Off the Water Supply
For outdoor spigots, turn the handle clockwise to close the valve. For indoor faucets, close the shutoff valve under the sink or turn off the main if there's no individual shutoff. This prevents water from spraying when you remove the aerator.
Step 2: Remove the Aerator
Most aerators unscrew counterclockwise by hand. If it's stuck due to mineral buildup, wrap a cloth around it and use pliers to break the seal — do not use bare metal pliers directly on chrome, as this will scratch the finish. Once removed, you'll typically find a housing, a rubber washer, one or two mesh screens, and a flow restrictor.
Keep track of the order in which parts come out — or take a photo before disassembly — so reassembly is straightforward. Aerators typically have 3 to 5 components that must go back in the correct sequence.
Step 3: Rinse Under Running Water
Before soaking, hold the aerator parts under a running tap and rinse away loose debris. Use your fingers to dislodge visible sediment. This reduces the work the vinegar soak has to do.
Step 4: Soak in White Vinegar
Place all the aerator components into a small bowl filled with undiluted white vinegar. Let them soak for a minimum of 30 minutes for light buildup. For heavy limescale — the kind that forms a visible white or yellowish crust — soak for 2 to 8 hours, or even overnight. The acetic acid in vinegar chemically reacts with calcium carbonate deposits, dissolving them without damaging most metal or rubber components.
If you can't remove the aerator, fill a small zip-lock bag with vinegar, position it over the spigot head so the nozzle is submerged in the vinegar, and secure the bag with a rubber band. Leave it for 30 to 60 minutes. This method works well for garden spigots and outdoor hose bibs where the aerator may be integrated into the nozzle.
Step 5: Scrub the Mesh Screen and Components
After soaking, use an old toothbrush to scrub the mesh screen under running water. Pay attention to the edges of the screen where deposits tend to concentrate. A toothpick or wooden skewer can help clear clogged holes in the mesh without damaging them — metal picks can tear the fine mesh.
For the housing and flow restrictor, scrub with the toothbrush and rinse. If white deposits remain after scrubbing, apply a paste of baking soda and a few drops of vinegar, let it fizz for 2 minutes, then scrub again.
Step 6: Rinse Thoroughly and Reassemble
Rinse all components completely under clean water to remove any residual vinegar or baking soda. Reassemble in the correct order, hand-tightening the aerator housing clockwise back onto the spigot. Avoid over-tightening — finger-tight plus a quarter turn with pliers (using a cloth) is sufficient.
Step 7: Test the Flow
Turn the water back on and check for leaks around the aerator connection and a consistent, even water stream. A clean aerator should produce a smooth, aerated flow. If you notice the stream is still uneven or restricted, the aerator may need to be replaced entirely — they typically cost between $2 and $10 and are widely available at hardware stores.
How to Clean an Outdoor Spigot or Garden Faucet
Outdoor spigots face conditions that indoor faucets don't: UV exposure, freezing and thawing cycles, garden soil, algae, insects, and contact with garden hoses that may carry their own contamination. An outdoor spigot that supplies water for washing vegetables, filling a pet water bowl, or hooking up to a drinking water hose requires more thorough cleaning than a decorative exterior faucet.
Cleaning the Exterior Body
Start by wiping down the entire exterior of the spigot body with a damp microfiber cloth to remove loose dirt and cobwebs. Mix a cleaning solution of warm water and a few drops of dish soap, then scrub the spigot handle, body, and any exposed pipe with the cloth or a soft-bristled brush. Pay extra attention to the area around the handle base, where grime and moisture collect.
For mold or algae growth (often visible as black or green streaking on the spigot body), mix 1 tablespoon of household bleach in 1 gallon of water. Apply with a cloth, let it sit for 5 minutes, then scrub and rinse completely. This dilution is effective against most surface mold without damaging metal finishes.
Cleaning the Spout and Nozzle
The spout opening on an outdoor spigot often accumulates rust staining and mineral deposits at the rim. Use the vinegar bag method described above — fill a bag, rubber-band it over the spout, and soak for 30 to 60 minutes. After soaking, scrub the opening with a toothbrush and rinse by briefly opening the valve.
Inspecting and Cleaning the Packing Nut and Valve Stem
If you're doing a deep clean of the outdoor spigot — or if it's been dripping — it's worth removing the handle and packing nut to access the valve stem. Here's how:
- Turn off the water supply to the spigot at the main shutoff or an inline valve.
- Remove the handle screw (usually located under a decorative cap on top of the handle) and pull the handle off.
- Use an adjustable wrench to loosen the packing nut — it's the large hex nut directly behind the handle.
- Unscrew the valve stem by turning it counterclockwise and pull it out of the body.
- Inspect the rubber washer at the bottom of the stem. If it's cracked, flattened, or crumbling, replace it — this is the most common cause of a dripping spigot faucet.
- Wipe the valve stem with a vinegar-dampened cloth to remove any mineral coating. Inspect the valve seat inside the spigot body — if it's rough or pitted, it may need to be replaced or refaced with a seat dressing tool.
- Reassemble in reverse order, applying a thin coat of plumber's grease to the threads before reinstalling the valve stem.
This level of cleaning is typically needed only every 2 to 5 years for a well-maintained spigot, or whenever you notice dripping or reduced flow that isn't resolved by aerator cleaning alone.
How to Remove Heavy Limescale from a Spigot
In regions with very hard water — parts of Texas, Arizona, California's Central Valley, and much of the UK — limescale buildup can be severe enough that vinegar alone takes many hours to fully dissolve it. Here are more aggressive approaches for stubborn deposits.
Extended Vinegar Soaks with Heat
Warming the vinegar to around 100 to 120°F (slightly above hand temperature) before soaking significantly accelerates the reaction. Place the aerator parts in a bowl, pour warm vinegar over them, and cover the bowl with a plate to retain heat. A 2-hour soak in warm vinegar often achieves what 8 hours of cold vinegar would.
Commercial Descalers
Products like CLR, Lime-A-Way, or Zud contain stronger acids — typically hydrochloric or phosphoric acid — that work faster than vinegar. Apply according to package instructions, usually 2 to 5 minutes of contact time. These products are not safe for use on natural stone, certain finishes like oil-rubbed bronze, or rubber components — check compatibility before use. Rinse the spigot and aerator components extensively after using commercial descalers, running water for at least 1 full minute to flush any residue.
Salt and Vinegar Paste for Surface Deposits
For external limescale on the spigot body and around the base of the spout, mixing salt and vinegar into a thick paste creates a mild abrasive cleaner. Apply the paste, leave it for 10 minutes, then scrub with a toothbrush and rinse. This works well on chrome and stainless steel finishes without scratching.
When to Replace Instead of Clean
If limescale has penetrated deep into the aerator mesh or the flow restrictor is visibly warped or cracked from mineral pressure, it's time to replace rather than clean. Replacement aerators for standard faucets cost $3 to $12 and are available at any hardware store — bring the old one with you to match the thread size and gender (male or female thread).
Sanitizing a Spigot for Drinking Water Use
If you use an outdoor spigot to fill drinking water containers, water pets, irrigate vegetable gardens, or connect to a drinking water hose, sanitizing it periodically is important. Cleaning removes debris and scale; sanitizing kills bacteria and biofilm.
NSF-Approved Sanitizing Method
The CDC and NSF International recommend using a diluted bleach solution for sanitizing water contact surfaces. Mix 1 teaspoon of unscented liquid chlorine bleach (5 to 8.25% concentration) per quart of water. Apply this solution to the spigot nozzle, aerator, and surrounding surfaces using a cloth. Let the solution sit for 1 minute, then rinse thoroughly with clean water before use.
Hydrogen Peroxide as an Alternative
A 3% hydrogen peroxide solution (standard pharmacy grade) is a bleach-free option for sanitizing faucet surfaces. It breaks down into water and oxygen after use, leaving no residue. Spray or apply directly to the spigot, wait 5 minutes, and rinse. It's less immediately powerful than bleach but effective for routine maintenance sanitizing.
Flushing the Lines Before First Use After Winter
After winter, before using an outdoor spigot for any water that may be consumed, run the faucet at full flow for 2 to 3 minutes to flush any standing water, sediment, or rust particles that accumulated during cold months when the shutoff valve was closed. This is a standard practice recommended by water utility providers in cold climates.
Cleaning Different Types of Spigot Finishes
Not all spigots are made the same, and cleaning methods that work perfectly for chrome can permanently damage oil-rubbed bronze or matte black finishes. Here's how to approach the most common finish types.
| Finish Type | Safe Cleaners | Avoid |
|---|---|---|
| Chrome | Vinegar, dish soap, baking soda paste, CLR (brief contact) | Abrasive scrubbers, steel wool |
| Brushed Nickel | Mild dish soap and water, vinegar (diluted 1:1 with water) | Undiluted vinegar (long contact), bleach-based cleaners |
| Oil-Rubbed Bronze | Mild soap and water only; dry immediately after | Vinegar, lemon juice, bleach, any acidic cleaner — all strip the patina |
| Matte Black | Mild soap and water, rinse thoroughly and dry immediately | Abrasives, acidic cleaners, bleach |
| Polished Brass | Vinegar and salt paste; commercial brass polish | Bleach, ammonia, abrasive pads |
| Stainless Steel | Vinegar, dish soap, baking soda, stainless steel cleaner | Steel wool, bleach at high concentration |
When in doubt, start with the mildest cleaner (dish soap and warm water) and work up from there. Test any new cleaner on a small, inconspicuous area first.
Signs Your Spigot Needs Immediate Cleaning or Repair
Some signs of spigot contamination or damage are obvious; others are easy to overlook. Watch for these indicators:
- Reduced water pressure or uneven spray pattern: Classic signs of aerator clogging. If the flow suddenly drops by 30 to 50 percent, start by cleaning or replacing the aerator before assuming a pipe pressure problem.
- White or yellowish crust around the spout: Limescale from hard water. This is cosmetic in the short term but leads to seal damage and flow restriction if left untreated for years.
- Rust-colored water when first turned on: Iron oxidation inside the pipes or from the spigot body itself. Run the water for 30 to 60 seconds; if the discoloration clears, it's surface rust. If it persists, the pipe or spigot may need replacement.
- Musty or sulfur-like smell from the faucet: Indicates bacterial growth in the aerator or biofilm in the supply line. This requires sanitizing with a bleach solution.
- Visible black or green spots on the nozzle or handle: Mold or algae growth, common on outdoor spigots. Requires cleaning with a disinfecting solution.
- Continuous dripping after the handle is closed: Usually a worn washer or damaged valve seat. Clean first; replace the washer if dripping continues.
- Leaking around the handle base or packing nut: The packing nut may need tightening (a quarter turn is often enough) or the packing material may need replacing.
How Often Should You Clean a Spigot?
Cleaning frequency depends on water hardness, usage level, and whether the spigot is indoor or outdoor. Here's a practical maintenance schedule:
- Every 3 to 6 months: Clean and descale the aerator on kitchen and bathroom faucets, especially in hard water areas. This is the minimum for maintaining good flow and hygiene.
- Every 6 months: Wipe down and sanitize outdoor spigots, especially before and after the gardening or irrigation season. Flush the lines after winter dormancy.
- Annually: Inspect the handle, packing nut, and valve stem on outdoor spigots. Replace washers if there is any dripping. Apply plumber's grease to the valve stem threads.
- Every 2 to 5 years: Deep clean or replace the aerator entirely. Inspect the valve seat on frequently used spigots. Consider installing a water softener if limescale buildup is severe and recurring.
- Immediately: Any time you notice reduced flow, discolored water, unusual smell, dripping, or visible mold growth.
Households in very hard water regions — where total dissolved solids (TDS) exceed 300 mg/L — may need to clean aerators as frequently as every 4 to 8 weeks to maintain full flow rate. Installing a point-of-use water filter or a whole-home water softener is worth considering in these situations.
Preventing Buildup: Tips for Long-Term Spigot Maintenance
Cleaning is reactive; maintenance is proactive. A few habits and small investments can dramatically reduce how often you need to do intensive spigot cleaning.
Dry the Spigot After Use
For outdoor spigots and chrome indoor faucets, wiping the spout and handle dry after use prevents standing water from depositing minerals as it evaporates. This one habit noticeably slows limescale formation, particularly on polished chrome and brushed nickel finishes.
Disconnect Garden Hoses When Not in Use
Leaving a garden hose connected to an outdoor spigot traps moisture at the connection point, accelerating corrosion and making it easier for insects and debris to enter the faucet. Disconnect hoses after each use and store them in a shaded area — UV exposure degrades rubber hoses significantly faster than storage in shade.
Install a Spigot Cover in Winter
In climates where temperatures drop below freezing, an insulated outdoor faucet cover (available for $5 to $15) protects the spigot from freeze damage and also keeps insects and debris from entering the spout. Shut off the indoor valve feeding the outdoor spigot and drain the line before covering it for winter.
Use a Filter on the Aerator Inlet
Some aerators are available with a built-in sediment filter that captures fine particles before they reach the mesh screen. These are particularly useful in older homes with galvanized pipes that shed rust particles. The filter cartridge can be rinsed clean or replaced, extending the life of the aerator mesh.
Apply a Wax or Sealant to Chrome Surfaces
A thin coat of car wax or a dedicated faucet sealant applied to the chrome or polished finish of a spigot creates a hydrophobic barrier that repels water droplets and reduces mineral adhesion. Reapply every 3 to 6 months. This is an especially effective strategy for faucets in bathrooms and kitchens where hard water contact is constant.
Monitor Water Hardness
Inexpensive water hardness test kits cost $5 to $15 and give you a baseline to work from. If your water exceeds 200 mg/L (hard to very hard), investing in a salt-based or salt-free water softener can reduce limescale buildup throughout your entire plumbing system, not just at the spigot. Over time, this reduces maintenance effort considerably and extends the life of appliances like water heaters and dishwashers.
Common Mistakes When Cleaning a Spigot
A few well-intentioned cleaning habits actually cause more harm than good. Here are the most common mistakes to avoid:
- Using steel wool or abrasive pads on chrome or nickel finishes: These scratch the protective layer off the finish, making the surface rougher and more prone to future deposits and corrosion.
- Leaving vinegar on oil-rubbed bronze or matte black finishes: Acid strips the patina and protective coating from these finishes in as little as 10 to 15 minutes of contact. Only soap and water should be used on these.
- Skipping the rinse after using commercial descalers: Residual acid continues working on metal surfaces and can damage seals and gaskets if not fully flushed.
- Reassembling the aerator in the wrong order: The washer, flow restrictor, and mesh screens have a specific sequence. Installing them incorrectly leads to leaks and poor spray patterns.
- Over-tightening the aerator or packing nut: Excessive force can crack the aerator housing or strip threads. Hand-tight plus a quarter turn is almost always sufficient.
- Ignoring the spigot entirely until it fails: A spigot that drips at just one drop per second wastes roughly 3,000 gallons of water per year. Routine cleaning and washer replacement prevent this waste and avoid emergency repairs.
- Mixing vinegar and bleach: These two common household cleaners should never be mixed or used in close sequence on the same surface. Together, they produce chlorine gas, which is hazardous in enclosed spaces. Use one or the other, and rinse thoroughly between applications if you need both.